
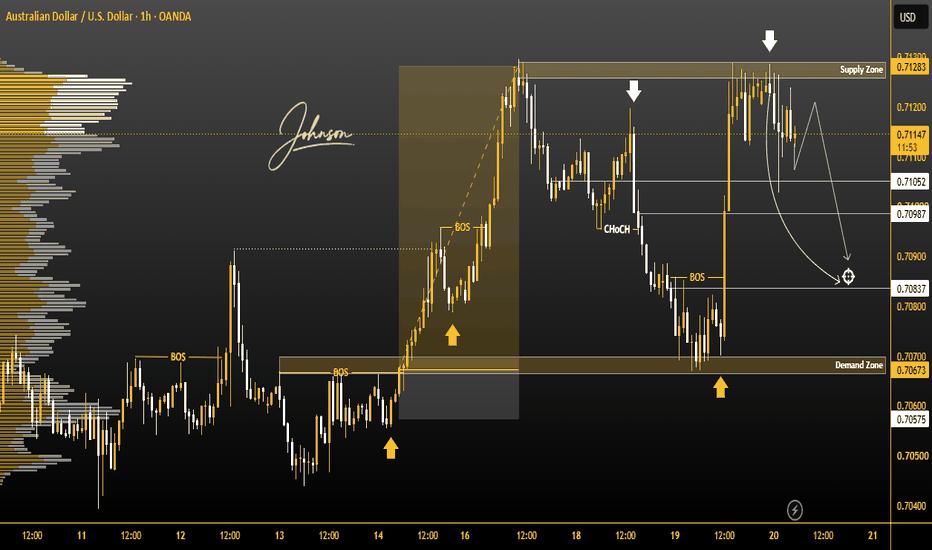
AUDUSD AUDUSD is currently trading in an important area where both the Demand Zone and Supply Zone are showing strong market reaction. This suggests that price may continue to respect these zones and move between them until a clear breakout or breakdown occurs.
On the 1H timeframe, traders should carefully monitor price action around these key zones. A strong rejection from the Demand Zone could support a bullish reaction, while rejection from the Supply Zone may create selling pressure.
🎯 Potential Downside Targets
Target 1: 0.71000
Target 2: 0.70900
Target 3: 0.70800
These targets can become active if bearish momentum develops and price continues moving lower from the current zone.
Market Structure
Pair: AUDUSD
Timeframe: 1H
Key Areas: Strong Demand & Supply Zones
Market Condition: Range / Zone Reaction
Targets: 0.71000 → 0.70900 → 0.70800
⚠️ Trade Confirmation
Do not rely on the zone alone. Wait for 1H price action confirmation, rejection, or a clear structural shift before taking a position. A sudden breakout can invalidate the current zone-to-zone setup.
免責事項:本記事で述べられている見解は著者の見解のみであり、Followmeの公式見解を反映するものではありません。Followmeは、提供された情報の正確性、完全性、信頼性について一切責任を負いません。また、書面で明示的に記載されている場合を除き、本記事の内容に基づいて行われたいかなる行動についても責任を負いません。