
Market Thesis:
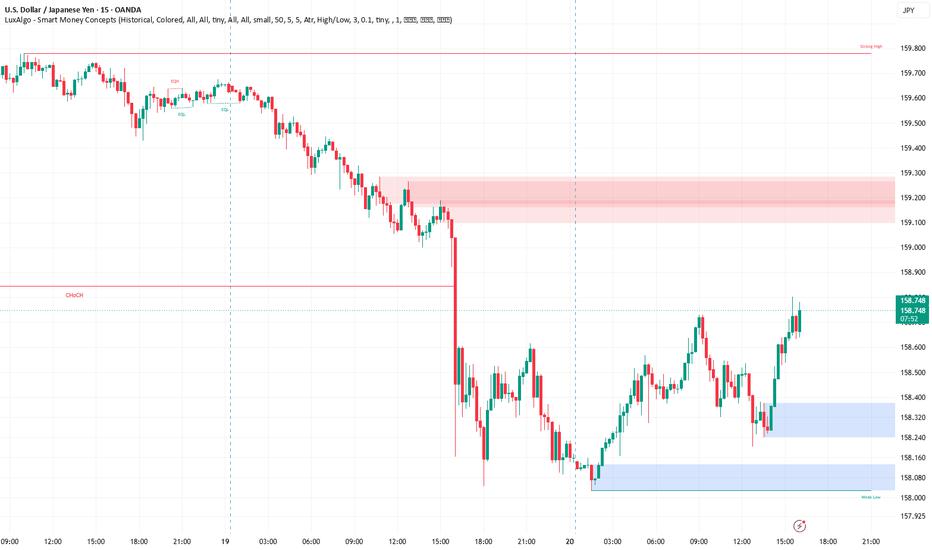
USD/JPY has printed a decisive bearish displacement through the 15-minute CHoCH at 158.843, shifting short-term order flow bearish. Price is now rebounding from the lower LuxAlgo demand zones, but remains below broken structure and the major overhead bearish zone at 159.100–159.283.
Unless buyers reclaim 158.843 with conviction, the current recovery remains vulnerable to another liquidity run toward the 158.000 Weak Low.
Visible Confluences (15-Minute):
Current price: 158.722
Major bearish CHoCH / broken structural level: 158.843
Earlier bullish CHoCH: 159.405
LuxAlgo bearish shaded zone: 159.100–159.283
Upper bullish shaded zone: 158.236–158.371
Lower bullish shaded zone: 158.021–158.124
Strong High: 159.781
Weak Low / exposed sell-side liquidity: 158.000
The sharp displacement below 158.843 confirms sellers achieved structural control; the present move higher is therefore a retracement until proven otherwise.
Trade Scenarios
Setup 1 — SELL | Primary 15M Bias
Entry Zone: 159.100–159.283
Trigger: Wait for price to trade into the bearish zone, then confirm with an LTF bearish CHoCH, strong rejection, or impulsive bearish momentum candle.
Stop Loss: 159.305
TP1: 158.843
TP2: 158.371
TP3: 158.000
This is the cleaner trend-aligned setup. Acceptance above 159.283 materially weakens the immediate bearish thesis.
Setup 2 — BUY | Tactical Counter-Trend Reaction
Entry Zone: 158.236–158.371
Trigger: Bullish LTF CHoCH or decisive rejection from the blue zone while maintaining structure above 158.236.
Stop Loss: 158.205
TP1: 158.722
TP2: 158.843
TP3: 159.100
This is a counter-trend trade while the 15M structure remains bearish. Confirmation is mandatory; do not treat first contact with the zone as an automatic entry.
Setup 3 — BUY | Liquidity-Sweep Reversal
Entry Zone: 158.021–158.124
Trigger: Preferably a sweep of the 158.000 Weak Low, followed by an immediate reclaim and bullish LTF structural shift back above the demand zone.
Stop Loss: 157.970
TP1: 158.236
TP2: 158.371
TP3: 158.843
The key distinction here is the reclaim. A sustained 15M close below 158.000 invalidates the bullish reversal idea and signals continued downside acceptance.
Refinement Tip:
For the best Risk/Reward, use the 15-minute chart for directional context and zone selection, then drop to lower timeframes such as 1M–5M. Look for an LTF CHoCH, displacement candle, rejection sequence, or clear momentum shift inside the identified zones before execution. Let structure trigger the trade—not simply price touching a level.
⚠️ Disclaimer:
Trading financial markets involves significant risk and no market outcome is guaranteed. This analysis reflects the structure and probabilities visible on the current chart only and is provided strictly for educational and analytical purposes. Always apply independent judgment, defined invalidation levels, and disciplined risk management.
免責事項:本記事で述べられている見解は著者の見解のみであり、Followmeの公式見解を反映するものではありません。Followmeは、提供された情報の正確性、完全性、信頼性について一切責任を負いません。また、書面で明示的に記載されている場合を除き、本記事の内容に基づいて行われたいかなる行動についても責任を負いません。