
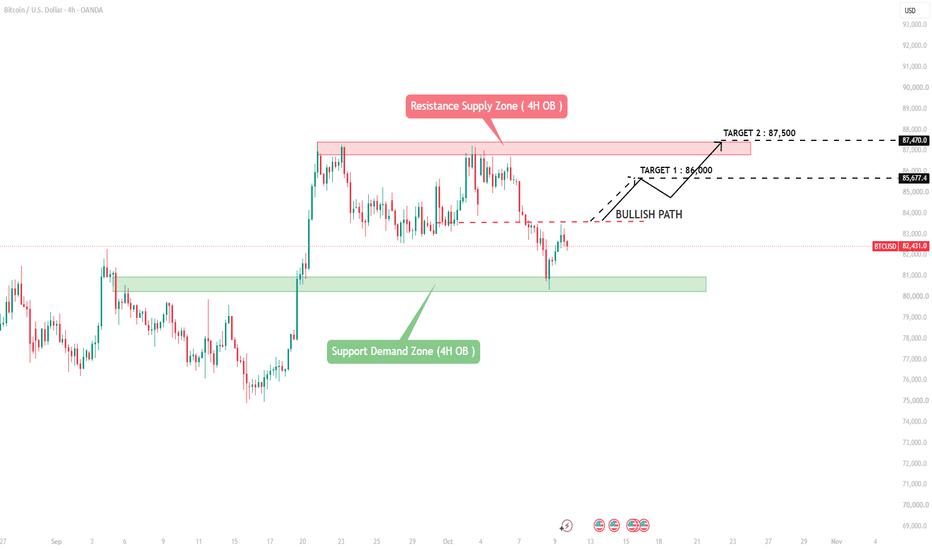
The 4-hour BTC/USD chart displays a neutral-to-bullish market structure following a successful liquidity sweep of the $80,500 – $81,200 demand zone, where price action reacted strongly with a corrective bounce. The current price consolidates near the $82,431 mark, acting as a pivotal decision region between immediate support and overhead supply. On the upside, a significant resistance and order block zone spans between $86,000 and $87,200, which serves as the primary multi-target expansion path if bulls successfully breach the $83,500 local trigger level. Conversely, failure to maintain the $81,000 support floor risks initiating a deeper corrective pullback toward lower liquidity resting near $78,500.
⚡ Live Price: $82,431 USD (4H Timeframe)
📊 1. What the Chart Says (Price Action & SMC Breakdown)
🔴 Resistance / Supply Zone: $86,000 – $87,200
🟢 Support / Demand Zone: $80,500 – $81,200
🟩 Turn Zone / Key Pivot: $82,000 – $82,500
📈 Price Action Mechanics:
Bitcoin recently swept liquidity near the $80,500 demand level and bounced back strongly into the $82,400 region. As long as price holds above the $81,000 support level, the broader structure remains intact for a retest of higher resistance levels.
🌍 2. Macro Fundamentals & Sentiment
🥇 Asset: Bitcoin (BTC/USD)
💵 Dollar Dynamics (DXY): High impact on crypto volatility.
🔥 Sentiment: Consolidation post-liquidity sweep, looking for expansion above $83,500.
🗺️ Price Scenarios
🎯 Main Scenario (Bullish Expansion):
- Hold above $81,000 – $82,000 demand block.
- Break & 4H close above $83,500 triggers expansion toward $86,000 and $87,500.
⚔️ Alternate Scenario (Bearish Breakdown):
- A 4H close below $80,000 invalidates the immediate bullish structure and targets lower liquidity near $78,000.
🎯 Entry Zones & Setup Parameters
🟢 TURN ZONE 1 (Buy/Long Setup):
📍 Entry Zone: $81,500 – $82,200
🛑 Stop Loss: $79,800
🎯 Take Profit 1 (TP1): $84,000
🎯 Take Profit 2 (TP2): $86,000
🎯 Take Profit 3 (TP3): $87,500
🚀 Breakout Confirmation:
📍 Entry Condition: 4H Candle Close above $83,600
🛑 Stop Loss: $82,100
🎯 TP1: $86,000 | TP2: $88,000
⚠️ Invalidation
🔻 Bearish Invalidation: 4H close below $80,000.
🔺 Bullish Confirmation: Strong 4H close above $83,500.
💡 Risk Management & Investor Advice
- Maintain strict position sizing (1-2% risk per trade).
- Move Stop-Loss to Breakeven once TP1 is achieved.
- Wait for candle confirmations before executing entries around turn zones.
⚠️ Disclaimer: This analysis is for educational purposes only and does not constitute financial advice. Always do your own research (DYOR).
免責事項:本記事で述べられている見解は著者の見解のみであり、Followmeの公式見解を反映するものではありません。Followmeは、提供された情報の正確性、完全性、信頼性について一切責任を負いません。また、書面で明示的に記載されている場合を除き、本記事の内容に基づいて行われたいかなる行動についても責任を負いません。